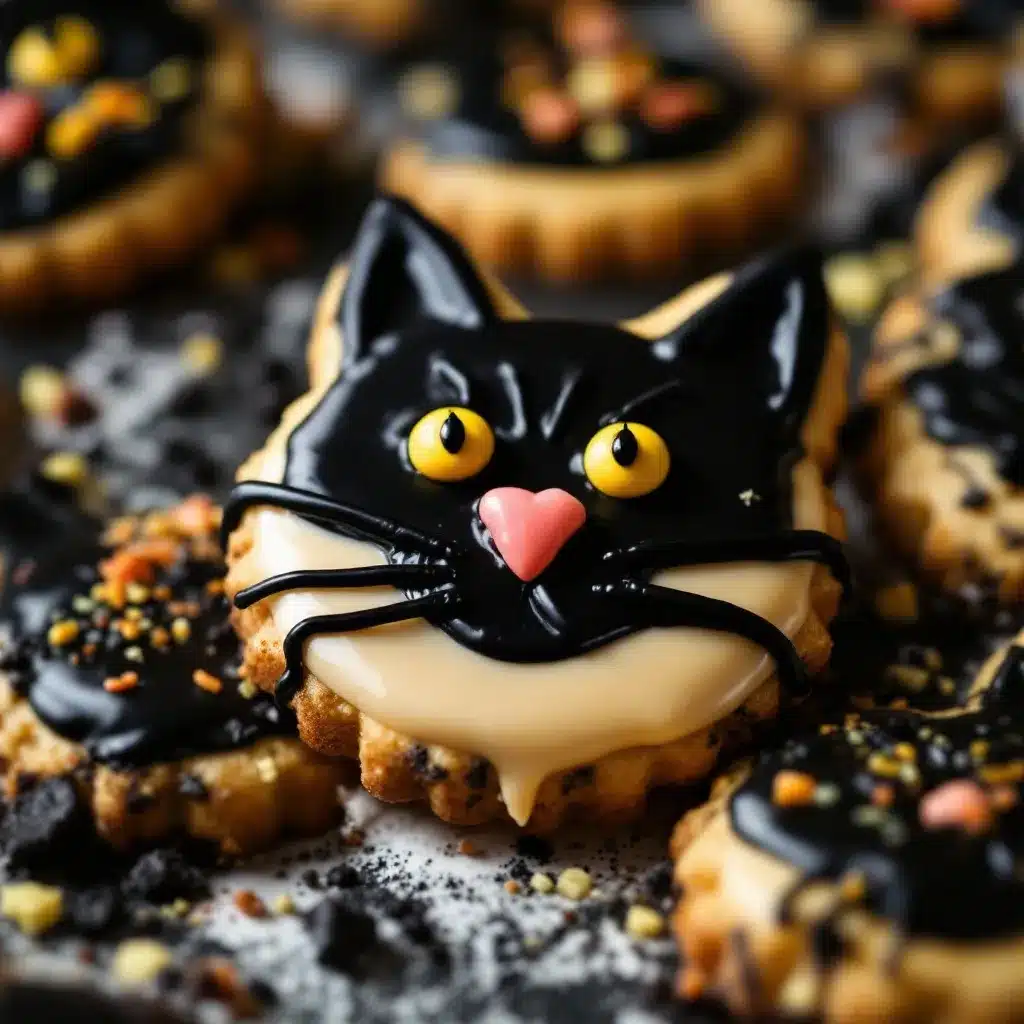
The kitchen light hums low at 10:47 PM, and the only thing I want is a quiet night with a batch of sugar cookie dough. October has a way of pulling me into the kitchen after dark—when the house settles and the only sound is the mixer. I had been sketching cat silhouettes on a napkin earlier that week, trying to figure out how to make a cookie that felt like Halloween without being over-the-top. You know, something that would make people smile but not scream. That’s when the idea stuck: a black cat, curled or stretching, with royal icing that dries to a perfect matte finish.
Honestly, I wasn’t trying to reinvent the wheel. I just wanted a cookie that looked like the stray that visits my porch every October—the one with the crooked tail and the knowing eyes. These black cat cookies are that cat, captured in sugar. They’re not fussy or frilly. They’re simple, dark, and a little mysterious, which is exactly what Halloween should be.
I tested four batches before I got the icing consistency right. The first one ran right off the cookie. The second was too stiff to pipe. But the third? That was the one. It held its shape but still settled into a smooth, glossy finish. I knew then that this recipe was worth sharing. So here it is: a sugar cookie that tastes like childhood, decorated like a Halloween night you’ll remember.
Why You’ll Love This Recipe
I’ve tested this recipe more times than I care to admit, and each batch taught me something new. Here’s why I keep coming back to it—and why I think you will too.
- Quick & Easy: The dough comes together in about 15 minutes, and the chilling time is just 30 minutes. You can have cookies on the cooling rack in under an hour.
- Simple Ingredients: No fancy extracts or hard-to-find flours. Butter, sugar, eggs, vanilla, flour, baking powder, and salt—that’s it. You probably have everything right now.
- Perfect for Halloween Parties: These cookies are the star of any spooky spread. They’re adorable, delicious, and way more memorable than store-bought candy.
- Crowd-Pleaser: Kids love the cat shape, and adults appreciate the buttery, melt-in-your-mouth texture. I’ve yet to meet someone who didn’t reach for a second one.
- Unbelievably Delicious: The cookie itself is soft in the center with slightly crisp edges—the kind of texture that makes you close your eyes after the first bite.
What makes this recipe different from the rest is the royal icing. I’ve perfected the ratio of powdered sugar to meringue powder so it dries hard but doesn’t taste like chalk. It pipes cleanly, floods smoothly, and sets with a beautiful matte finish that looks professional without being intimidating. This isn’t just another decorated cookie—it’s the one you’ll actually want to eat.
There’s something about making these cookies that feels like a small ritual. You’re not just baking—you’re creating a little piece of October magic. And when you see that first cat face staring back at you, you’ll understand why I can’t stop making them.
What Ingredients You Will Need
This recipe uses simple, wholesome ingredients to deliver a sugar cookie that’s buttery, tender, and just sweet enough. The royal icing is made with pantry staples, so you don’t need to hunt down specialty items.
For the Sugar Cookies
- Unsalted butter, 1 cup (226g), softened to room temperature (adds richness and tenderness)
- Granulated sugar, 1 cup (200g) (for sweetness and structure)
- Large egg, 1, room temperature (binds the dough)
- Pure vanilla extract, 1 teaspoon (I prefer Nielsen-Massey for the best flavor)
- All-purpose flour, 2 and 3/4 cups (344g), spooned and leveled (don’t scoop directly from the bag—it packs the flour and makes cookies dry)
- Baking powder, 1/2 teaspoon (adds a slight lift without spreading)
- Salt, 1/4 teaspoon (balances sweetness)
For the Royal Icing
- Powdered sugar, 4 cups (480g), sifted (no lumps allowed!)
- Meringue powder, 3 tablespoons (I recommend Wilton brand for consistent results)
- Warm water, 5-6 tablespoons (adjust for consistency)
- Gel food coloring, black (use gel, not liquid—liquid will thin the icing too much)
- Vanilla extract, 1/2 teaspoon (optional, for flavor)
When selecting butter, go for unsalted so you control the salt level. If you only have salted butter, reduce the added salt to a pinch. For the flour, I use Gold Medal all-purpose—it’s reliable and gives consistent results every time. If you’re gluten-free, a 1:1 gluten-free baking flour blend works, but the cookies will be slightly more crumbly.
For the royal icing, meringue powder is non-negotiable if you want a hard, shiny finish. You can use fresh egg whites (pasteurized), but meringue powder is safer and more stable. If you’re vegan, aquafaba (the liquid from canned chickpeas) can replace the meringue powder and water, but the texture will be slightly softer.
Equipment Needed
You don’t need a professional bakery setup to make these cookies, but a few tools make the process much smoother.
- Stand mixer or hand mixer: A stand mixer with a paddle attachment is ideal, but a hand mixer works fine—just be prepared to scrape the bowl more often.
- Rolling pin: I use a French rolling pin (no handles) because I can feel the dough thickness better, but any rolling pin works. If you have adjustable rings, even better.
- Cat-shaped cookie cutter: I found mine at a craft store for $3. You can use any Halloween shape—bat, pumpkin, ghost—but the cat is the star here.
- Parchment paper or silicone baking mat: Silpat mats give the most even browning, but parchment is cheaper and works just as well.
- Piping bags and tips: I use disposable piping bags with a #2 round tip for outlining and a #3 tip for flooding. You can also use a squeeze bottle for flooding if you prefer.
- Cooling rack: Essential for letting cookies cool completely before decorating. If you ice warm cookies, the icing will slide right off.
- Small offset spatula: Helps spread dough evenly and smooth icing if needed.
If you don’t have a piping bag, a ziplock bag with a tiny corner snipped off works in a pinch. Just be careful—the bag can burst if you squeeze too hard. I learned that the hard way, and let’s just say my kitchen looked like a black icing crime scene.
Preparation Method
Follow these steps carefully, and you’ll have perfect black cat cookies every time.
Step 1: Make the Cookie Dough
In a large bowl (or stand mixer bowl), beat the softened butter and granulated sugar together on medium speed until light and fluffy, about 2-3 minutes. Scrape down the sides and bottom of the bowl. Add the egg and vanilla extract, then beat until combined. The mixture should look smooth and creamy.
In a separate bowl, whisk together the flour, baking powder, and salt. Gradually add the dry ingredients to the wet mixture, mixing on low speed until just combined. Don’t overmix—stop as soon as no streaks of flour remain. The dough will be soft but not sticky. If it feels too sticky, add a tablespoon more flour.
Step 2: Chill the Dough
Divide the dough in half, shape each half into a flat disc (about 1 inch thick), and wrap tightly in plastic wrap. Refrigerate for at least 30 minutes, or up to 2 days. Chilling prevents the cookies from spreading in the oven and makes the dough easier to roll. If you skip this step, your cats will come out looking like blobs.
Step 3: Roll and Cut
Preheat your oven to 350°F (175°C). Line two baking sheets with parchment paper or silicone mats. Lightly flour your work surface and rolling pin. Roll one disc of dough to 1/4-inch thickness. I like to roll between two sheets of parchment paper—it prevents sticking and makes cleanup a breeze.
Cut out cat shapes using your cookie cutter. Place them about 2 inches apart on the prepared baking sheets. Gather the scraps, re-roll, and cut more cookies. You should get about 24-30 cookies, depending on the size of your cutter.
Step 4: Bake
Bake for 8-10 minutes, or until the edges are just barely golden. The centers should look set but not brown. Rotate the baking sheet halfway through for even baking. Let the cookies cool on the baking sheet for 5 minutes, then transfer to a wire rack to cool completely. Do not ice warm cookies—the icing will melt and run.
Step 5: Make the Royal Icing
In a stand mixer bowl (or large bowl with hand mixer), combine the sifted powdered sugar and meringue powder. Add 5 tablespoons of warm water and the vanilla extract. Beat on low speed until combined, then increase to medium-high and beat for 4-5 minutes. The icing should be thick, glossy, and hold stiff peaks. If it’s too thick, add water 1 teaspoon at a time. If it’s too thin, add more powdered sugar 1 tablespoon at a time.
Step 6: Color and Pipe
Divide the icing into two bowls. Add black gel food coloring to one bowl (the flood icing) and leave the other white (for details like eyes). For the flood icing, thin it with water until it reaches a 10-15 second consistency—meaning when you lift the spatula, the icing ribbons fall back into the bowl and the surface smooths out in 10-15 seconds. Transfer each icing to separate piping bags fitted with #2 tips.
Step 7: Decorate
Outline each cookie with the black icing, then flood the center. Use a toothpick to guide the icing into corners. Let the base layer dry for 1-2 hours (or overnight). Once dry, pipe white dots for eyes and small details. Let the cookies dry completely for 6-8 hours before stacking or packaging.
Cooking Tips & Techniques
I’ve made every mistake you can imagine with these cookies, so you don’t have to.
Don’t overwork the dough. The more you handle it, the tougher the cookies will be. Mix until just combined, and roll gently. If the dough cracks at the edges, let it sit at room temperature for 5 minutes before rolling again.
Chill the cut-out shapes. If your kitchen is warm, pop the baking sheet with the cut-out cookies in the fridge for 10 minutes before baking. This helps them hold their shape and reduces spreading. I learned this after my first batch of cats turned into amorphous blobs.
Use a light hand with flour. Too much flour on the work surface will dry out the dough. Use just enough to prevent sticking, and brush off excess flour from the cut cookies before baking.
Get the icing consistency right. This is the trickiest part. If the icing is too thick, it won’t spread. If it’s too thin, it will run off the cookie. Test it by piping a small dot—if it holds its shape but slowly settles, you’re good. If it immediately flattens, add more powdered sugar.
Work in batches. Don’t try to ice all the cookies at once. The icing can dry out in the piping bag. Keep unused icing covered with a damp paper towel to prevent crusting.
Let the base layer dry completely. I know it’s tempting to add details right away, but if the base isn’t dry, the white icing will bleed into the black. Wait at least an hour, or better yet, decorate the next day.
Variations & Adaptations
This recipe is surprisingly flexible. Here are a few ways to make it your own.
Gluten-Free Version
Swap the all-purpose flour with a 1:1 gluten-free baking blend that contains xanthan gum. I’ve used Bob’s Red Mill with good results. The cookies will be slightly more delicate, so handle them gently. Chill the dough for an extra 15 minutes before rolling.
Vegan Royal Icing
Replace the meringue powder with 3 tablespoons of aquafaba (chickpea brine) and omit the water. Beat until stiff peaks form. The icing will be slightly softer than traditional royal icing, so let it dry for a full 24 hours before stacking.
Flavor Variations
Add 1/2 teaspoon of almond extract to the cookie dough for a subtle nutty flavor. Or replace the vanilla in the icing with 1/4 teaspoon of peppermint extract for a holiday twist. I once made a batch with orange zest in the dough—it paired surprisingly well with the black icing.
Different Shapes
Use a bat, pumpkin, or ghost cutter instead of a cat. The recipe works with any shape. Just adjust the baking time if the shapes are much larger or smaller. For mini cookies, bake for 6-7 minutes.
No-Ice Option
If royal icing feels like too much work, dust the cooled cookies with powdered sugar or drizzle with melted dark chocolate. They won’t look as polished, but they’ll still taste amazing.
I once made a batch with a pinch of cinnamon in the dough, and it gave the cookies a warm, cozy undertone that was perfect for a fall evening. Sometimes the best variations come from happy accidents.
Serving & Storage Suggestions
These cookies are best served at room temperature. Arrange them on a platter with other Halloween treats—like creamy vegan chocolate avocado pudding—for a spooky dessert spread. They also pair beautifully with a warm cup of apple cider or a refreshing cucumber mint green tea cooler if you want something lighter.
Storage: Store decorated cookies in an airtight container at room temperature for up to 2 weeks. Layer them between sheets of parchment paper to prevent the icing from sticking. Do not refrigerate—the humidity can cause the icing to soften and become sticky.
Freezing: You can freeze the undecorated baked cookies for up to 3 months. Wrap them tightly in plastic wrap and place in a freezer-safe bag. Thaw at room temperature before decorating. I’ve also frozen the raw dough discs for up to 2 months—just thaw overnight in the fridge before rolling.
Reheating: These cookies are meant to be eaten at room temperature. If you want a softer texture, microwave one for 5 seconds. But honestly, they’re perfect as is.
The flavors actually deepen after a day or two. The vanilla becomes more pronounced, and the cookie softens slightly. So if you can resist eating them all immediately, they’ll taste even better tomorrow.
Nutritional Information & Benefits
Let’s be real—these are sugar cookies. They’re a treat, not a health food. But here’s what you should know.
Per cookie (based on 30 cookies): Approximately 150 calories, 6g fat, 22g carbohydrates, 1g protein, 14g sugar. Values will vary based on icing thickness and cookie size.
Health highlights: The butter provides vitamin A and healthy fats. The egg adds protein. And the vanilla extract contains small amounts of antioxidants. But honestly, the real benefit is the joy of making something beautiful with your hands.
Dietary considerations: This recipe contains dairy, eggs, and gluten. For a dairy-free version, use vegan butter (I recommend Earth Balance). For egg-free cookies, use a flax egg (1 tablespoon ground flaxseed mixed with 3 tablespoons water, let sit for 5 minutes). The texture will be slightly different—more cake-like than buttery.
Allergens: Wheat, dairy, eggs. The royal icing contains meringue powder, which is made from dried egg whites.
I don’t pretend these are healthy, but I do believe in balance. A cookie like this, made with real ingredients and shared with people you love, is good for the soul. And sometimes that’s exactly what you need.
Conclusion
These black cat Halloween sugar cookies are more than just a pretty face. They’re buttery, tender, and just sweet enough—the kind of cookie that disappears from the plate before you can blink. The royal icing takes them from simple to spectacular, but don’t let that intimidate you. With a little patience and the tips I’ve shared, you’ll be piping like a pro in no time.
What I love most about this recipe is how it brings people together. I’ve made these cookies with my niece, who laughed every time she piped a crooked eye. I’ve brought them to Halloween parties, where they vanished within minutes. And I’ve left a plate on my porch for that stray cat with the crooked tail—he didn’t eat them, but he sat beside them all night, as if he knew they were his tribute.
I’d love to see your versions. Tag me when you make them, tell me about your decorating adventures, and don’t be afraid to mess up—the imperfect ones are always the most charming. If you’re looking for more easy recipes, try my tender slow cooker honey garlic chicken and vegetables for a savory break from all the sugar. Happy Halloween, friend. Go make some magic.
Frequently Asked Questions
Can I use a different cookie cutter shape?
Absolutely. This dough works with any shape. Just adjust the baking time if the shapes are much larger or smaller. For mini cookies, check them at 6 minutes.
My royal icing is too runny. What do I do?
Add more sifted powdered sugar, 1 tablespoon at a time, until it reaches the right consistency. If it’s too thick, add water 1 teaspoon at a time. The ideal consistency is thick enough to hold a peak but thin enough to smooth out in 10-15 seconds.
Can I make the dough ahead of time?
Yes. You can refrigerate the dough discs for up to 2 days or freeze them for up to 2 months. Thaw frozen dough overnight in the fridge before rolling. The flavor actually improves after a day of resting.
Why did my cookies spread?
This usually happens when the dough wasn’t chilled long enough, or the butter was too soft. Make sure your butter is at room temperature (not melted), and chill the cut-out shapes for 10 minutes before baking. Also, check that your baking powder isn’t expired.
How long do these cookies stay fresh?
Stored in an airtight container at room temperature, decorated cookies stay fresh for up to 2 weeks. Undecorated cookies can be frozen for up to 3 months. The royal icing actually helps preserve the cookie’s freshness by sealing out moisture.
Pin This Recipe!

Perfect Black Cat Halloween Sugar Cookies with Royal Icing

Buttery, tender sugar cookies shaped like black cats, decorated with a smooth matte royal icing. Perfect for Halloween parties and spooky dessert spreads.
- Prep Time: 15 minutes
- Cook Time: 10 minutes
- Total Time: 55 minutes (includes 30 minutes chilling)
- Yield: 24-30 cookies 1x
- Category: Dessert
- Cuisine: American
Ingredients
- 1 cup (226g) unsalted butter, softened to room temperature
- 1 cup (200g) granulated sugar
- 1 large egg, room temperature
- 1 teaspoon pure vanilla extract
- 2 and 3/4 cups (344g) all-purpose flour, spooned and leveled
- 1/2 teaspoon baking powder
- 1/4 teaspoon salt
- 4 cups (480g) powdered sugar, sifted
- 3 tablespoons meringue powder
- 5–6 tablespoons warm water
- Black gel food coloring
- 1/2 teaspoon vanilla extract (optional, for icing)
Instructions
- In a large bowl, beat softened butter and granulated sugar together on medium speed until light and fluffy, about 2-3 minutes. Scrape down sides. Add egg and vanilla extract; beat until combined.
- In a separate bowl, whisk together flour, baking powder, and salt. Gradually add dry ingredients to wet mixture, mixing on low until just combined. Do not overmix.
- Divide dough in half, shape into flat discs (1 inch thick), wrap in plastic wrap, and refrigerate for at least 30 minutes or up to 2 days.
- Preheat oven to 350°F (175°C). Line baking sheets with parchment paper or silicone mats.
- Lightly flour work surface and rolling pin. Roll one disc of dough to 1/4-inch thickness. Cut out cat shapes with cookie cutter. Place 2 inches apart on prepared baking sheets. Gather scraps, re-roll, and cut more cookies.
- Bake for 8-10 minutes, until edges are just barely golden. Rotate baking sheet halfway through. Cool on baking sheet for 5 minutes, then transfer to wire rack to cool completely.
- For royal icing: In a stand mixer bowl, combine sifted powdered sugar and meringue powder. Add 5 tablespoons warm water and vanilla extract. Beat on low until combined, then increase to medium-high and beat for 4-5 minutes until thick, glossy, and holds stiff peaks. Adjust consistency with water or powdered sugar as needed.
- Divide icing into two bowls. Add black gel food coloring to one bowl (flood icing). Thin flood icing with water to 10-15 second consistency. Transfer each icing to separate piping bags fitted with #2 tips.
- Outline each cookie with black icing, then flood the center. Use a toothpick to guide icing into corners. Let base layer dry for 1-2 hours or overnight.
- Pipe white dots for eyes and small details. Let cookies dry completely for 6-8 hours before stacking or packaging.
Notes
Chill cut-out shapes for 10 minutes before baking to prevent spreading. For royal icing, test consistency by piping a small dot—it should hold its shape but slowly settle. Let base layer dry completely before adding details to prevent bleeding. Store decorated cookies in an airtight container at room temperature for up to 2 weeks.
Nutrition
- Serving Size: 1 cookie
- Calories: 150
- Sugar: 14
- Sodium: 45
- Fat: 6
- Saturated Fat: 3.5
- Carbohydrates: 22
- Protein: 1
Keywords: Halloween cookies, sugar cookies, black cat cookies, royal icing, decorated cookies, spooky cookies, fall baking